Hi everyone! We're hard at work trying to keep our community clean, so if you see any spam, please report it here and we'll review ASAP! Thanks a million!
The engine’s Electronic Control Module (ECM) has the ability to monitor the circuitry between the ECM and the engine’s components. The ECM also has the ability to monitor the engine’s operating conditions. If the ECM detects a problem, a code is generated.
There are three categories of codes: -Diagnostic Code -Event Code -Flash Code
-Diagnostic Code – A diagnostic code indicates an electrical problem such as a short or an open in the engine’s wiring or in an electrical component. -Event Code – An event code is generated by the detection of an abnormal engine operating condition. For example, an event code will be generated if the oil pressure is too low. In this case, the event code indicates the symptom of a problem. Event codes indicate mechanical problems rather than electrical problems. -Flash Code – Diagnostics and events are reported via flash codes. When a diagnostic code or an event code becomes active, the specific condition is immediately reported to the operator through a series of flashes on the diagnostic lamp. By counting the flashes, a numeric representation of the diagnostic code or event code is revealed.
Codes can have two different states: -Active -Logged
-Active Codes An active code indicates that a problem is present. Service the active code first.
-Logged Codes The codes are logged and stored in the CAT Caterpillar ET ECM memory. The problem may have been repaired and/or the problem may no longer exist. If the system is powered, it is possible to generate an active diagnostic code whenever a component is disconnected. If the component is reconnected, the code is no longer active but the code may become logged.
Logged codes may not indicate that a repair is needed. The problem may have been temporary. Logged codes may be useful to help troubleshoot intermittent problems. Logged codes can also be used to review the performance of the engine and of the electronic system.
Project Porsche Piwis3 PT3G => VAS6154-Kolun a look at below link when you take your right to use 1 have to have installed piwis 3 laptop. 2. install piwis 3 driver 3 put together VAS 6154 install the drivers for vas6154-piwis // attempt to update interface Flesch, if you see 6154 as pt3g then it is ok if nevidi next step => 4 separated you from laptop 5. Copy the deteskop and install VAS 6154 driver 3.0.2.807 // installation after installation tend to deteskopa the trash 6 interface connects you 6154 7 program you run driver 8 interface you see 6154 9 select USB. Save. 10 restart. 11 tart driver program tach app (the first option above left) choose passthru> pt3g-3 piwis install seeks interface. 12 restart 13 Interface joints run driver VAS6154 seen as a passthru pt3g update memory device, check the USB version pt3g dal see you ok almost 6154
Note: please be careful and do it on your own risk. Obd2tool.com will not give support
Contributor: ibi1961
Update: Unless you find the 08 firmware The picture below is VAS 6154
VERY IMPORTANT:
For sake of security, you’re advised to use odis with vas6154 and use piwis with porsche tester 3
with relief!
Piwis III V37.250.020 – confirmed to work no issues with Vxdiag Porsche
Diagnostic test: passed
Coding: passed
Programming: passed
attached VAS 6154 driver download, installation instruction, wlan setup….
X-PROG box ECU programmer has been updated to newest version 6.12. It comes with USB dongle, no need activation. With new generation hardware, runs more steady and faster than old version. Here share the tips and guide to use and install Xprog V6.12.
XPROG V6.12 Display
Part 1: How to use XPROG V6.12
XPROG V6.12 ECU Programmer added new authorization: AUTH-0028-3 Renesas RL78 and AUTH-0028-4 Renesas M32C. It only supports English, can be used on Win XP/ Win7 and Win8.
Tips to use XPROG V6.12:
1.XPROG-M V6.12 dongle isn’t compatible with older version Xprog. 2.Please close all anti-virus software in your computer, because the anti-virus software will kill Xprog-M V6.12 driver. 3.Disconnect internet. If not, the internet may damage XPROG hardware. 4.Uninstall all the old version XPROG software before you install V6.12 software, because XPROG-M V6.12 hardware is not compatible with other versions of XPROG software. 5. Never try to UPDATE it, otherwise the hardware will be damaged if you try to update it online.
Part 2: How to install XPROG V6.12 ECU Programming Tool
Before installing, please make sure the operation system meets the the following needs.
1.Windows system should be windows XP 32bit or windows 7 64 bit, all the patch software for the windows system should be installed already and the windows properly works well. 2.The windows system should be with at least 2 partitions (except the CD ROM.) 3.Can not be working with virtual hard disk.
4 steps to install XPROG V6.12 software:
1. Click the file “installation.reg”, get the file information to the regedit. 2. The file “AdbeRdr11000_zh_CN.exe” must be installed, otherwise the Xprog software will fail to start. 3. Plug the Xprog main interface to the computer and install the USB driver. 4. Copy the folder “XPROG-BOX6.12” to the desktop, and open it, and run the “xprogdesktop.exe”, then open the software.
There are many GM GDS software version on internet,and for the different version need to use compatible interface,the installation methods are different,so here collection of GM GDS2 installation guide here.
GM GDS2 Installation Requirements:
A minimum of 2 GB of RAM is required to run GDS 2. Download and installation time is dependent upon the internet bandwidth available during the download process. The GDS 2 application needs to be loaded on each shop PC individually. Once the initial application installation is complete, GDS 2 will run in either a standalone mode when launched from the PC desktop icon or from TIS2Web.
Before installation,you can download the GM GDS2 Software Here.
How to install GM MDI Manager 8.3.103.39 on Windows 7? (Main steps)
1.Run Setup.exe→ I accept… → Select language ” nao en”, “opel en”→ Install Global TIS
2.Global TIS Registration→ Edit dealership data→ Email registration→ Save “Registration PDF” file to seller for GM MDI software activation→ Complete Subscriber ID and License Key
3.Install Adobe Reader→ Install Java→ Install GDS2 8.3.103.39 GM MDI Software→ Install Tech2win→ Set Tech2win language
4.Install wizard for RNDIS/ Ethernet Gadget
5.Set Local Area Connection 2 Properties→ Internet Protocol (TCP/IP)
6.Open GM MDI Manager→ Connect→ Open Global TIS→ Yes→ OK
7.Open Tech2win→ Choose Configuration: nao en→ “Security” tab→ Download then run Security Access Service Client
Choose Configuration: opel en→ “Security” tab→ Download then run Security Access Service Client
Go to “GDS2” tab→ Start GDS2→ Select language
8.Launch GDS2 and now enjoy the software
Download Software Install Guide
1- Install GDS2Install then install GDS2JavaInstall
2- Put the zip file called deliverable GM Global or OpelVauxhall v2018.1 into the below folder:
3- Open GDS2 and click Manage Diagnostics Packages
4- Click on browes
5- Then go to: CrogramDataGDS2PersistentDataDownloadsDataBackups
6- Then click for exemple on deliverable_OpelVauxhall v2018.1 and click on open
7- GDS2 will restart
Finally you can enjoy your software
VADIAG NANO GM GDS2 Software Installation Guide:
Insert the CD into the computer running WIN7/8 64bit
Firstly Install VMware player 1)Open DVD, click “VMware player” to finish VMware Player setup.
2). Back to the DVD files, copy the folder “GDS2 VM”, then paste it into you local disk for example Local Disk(E
3) Go to the desktop, open “VMware Player”.
4). Load “GDS2 VM”, open “Win_XP_GDS_11_2014
5) Play virtual machine
6) Disable network connection before continue operating. Go to “My Computer”, then device manager, check if the “USB Serial Port (Com3)” display
7) Open “VX Manager” on the desktop.
Open “GDS2” on the desktop. Click “Diagnostic”.
You now can use GDS software diagnostic your GM vehicle.
Scania 4 series do not have a coordinator and uses VCI 1 to connect to the vehicle to run SD2/SP2. To read engine data in real time with for example Scanina XCOM you have to connect to CAN with VCI 2. To do that you need a “homemade” VCI-cable, see below, and a software-fix to connect to the engine control unit (ECU).
How to Install Scania VCI-3 V2.30 Diagnostic Software
It also works with DMecNet, CDev, Gadget and other SCOMM based programs.
1.You need:
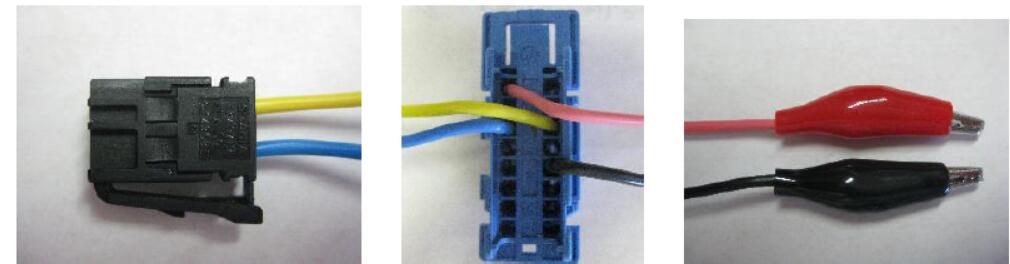
Standard CAN connector (Scania P/N 1349719)
4 cables (approx. 40cm)
2 alligator clip
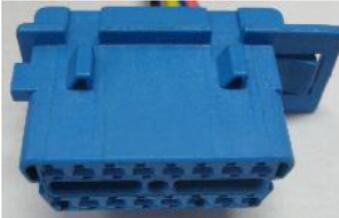
Standard VCI connector
2.Connect the wires according to pictures
Pin 16 to red alligator clip
Pin 4 to black alligator clip
Pin 6 and 14 to CAN connector
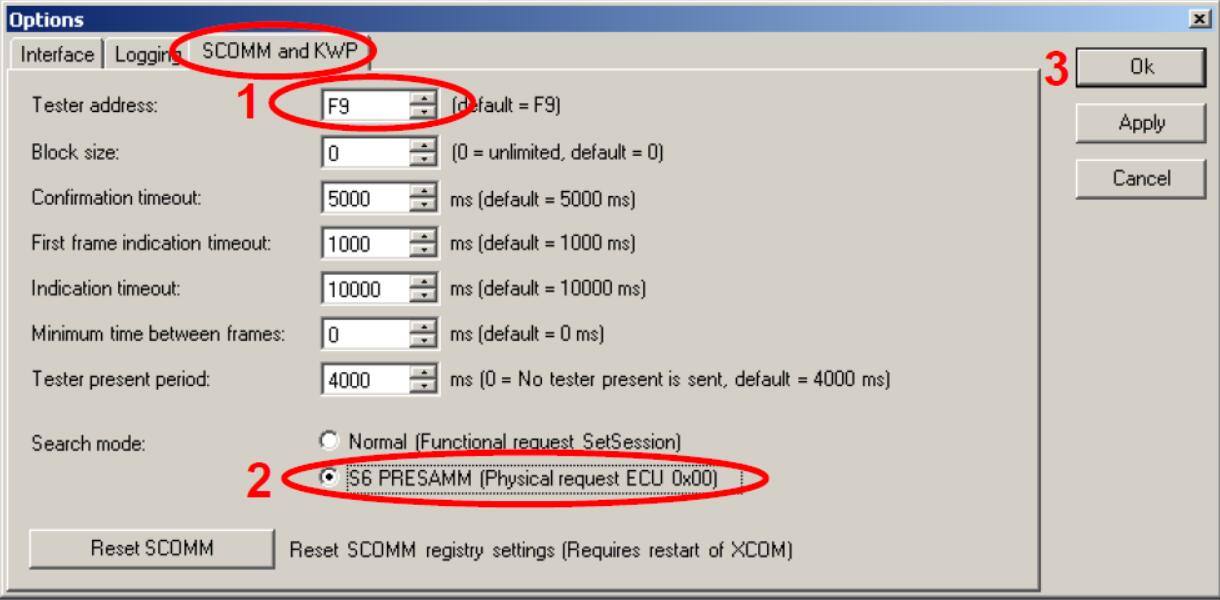
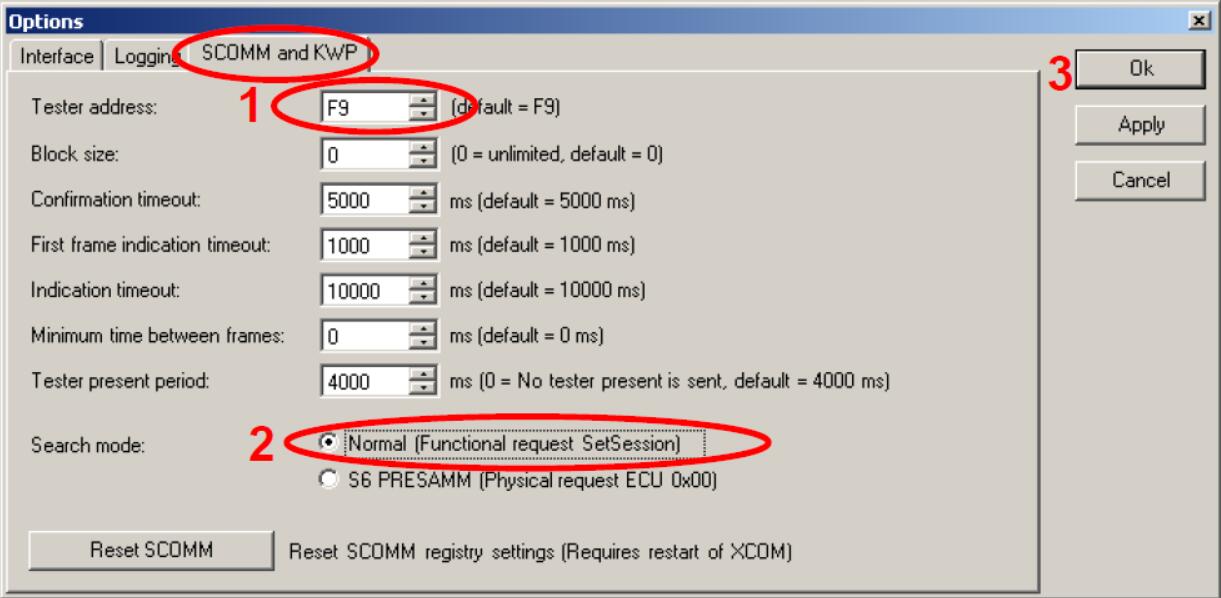
3.Set the tester address and search mode in XCOM These changes will make XCOM, SDP3, Gadget, CDev and DMecNet to only scan for EMS on the CAN bus. No other ECUs will be found!
Open Options in XCOM (Options menu -> Options)
Set Tester address to “F9”
Change search mode to “S6 PRESAMM (Physical request ECU 0x00)”. Select OK on the warning.
Press OK to accept changes.
Restart XCOM
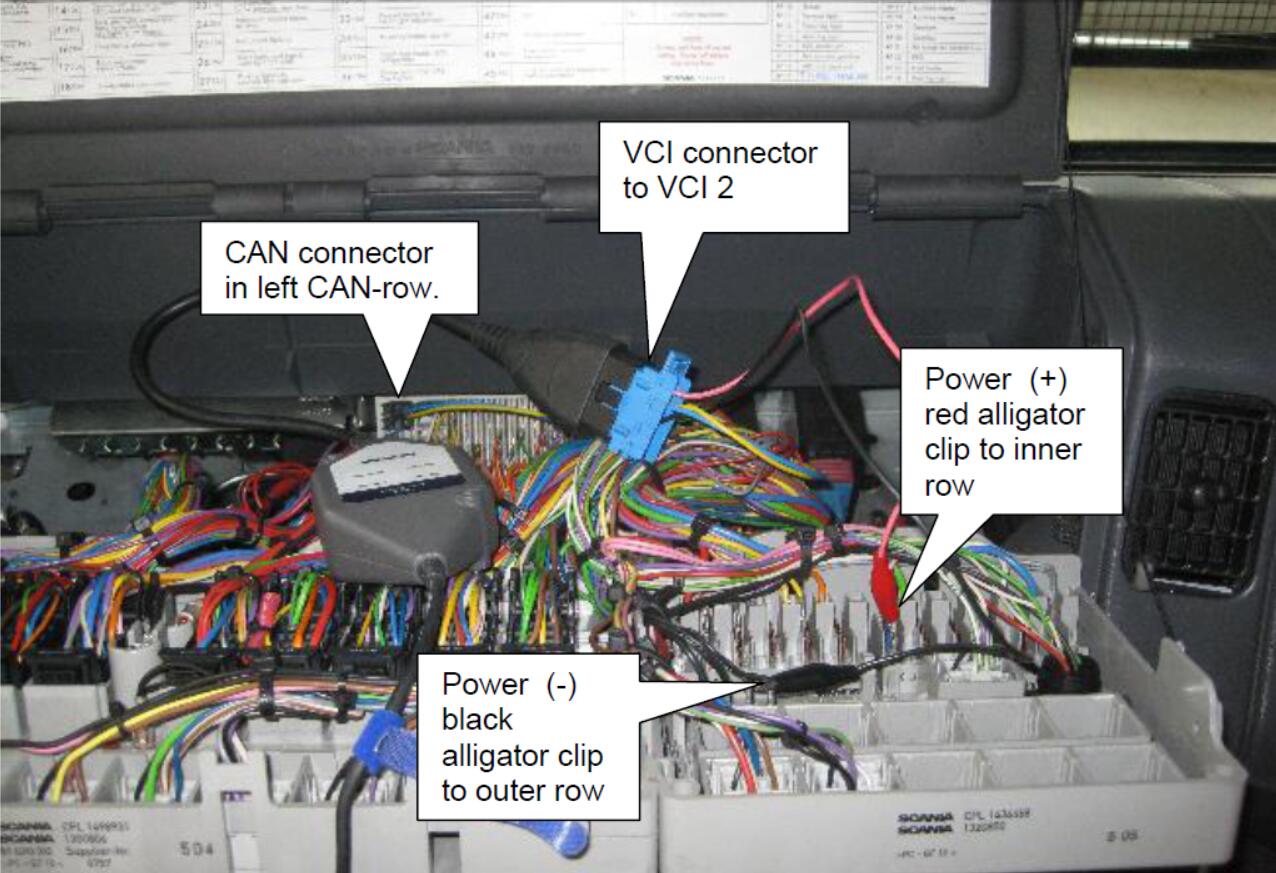
4.Connect the “Homemade” VCI cable to the vehicle under the fuse box. Connect VCI2 to the VCI connection.
This VW repair case from one of my blog reader,I share it here hope it helps!It is focus on how to repair VW 01276 fault code trouble VW ABS hydraulic pump v64.And for more about VW repair,please refer to Volkswagen trouble repair.
Symptoms:
The ABS warning light on when pressing brake pedal during driving,and the ABS can not work correctly.
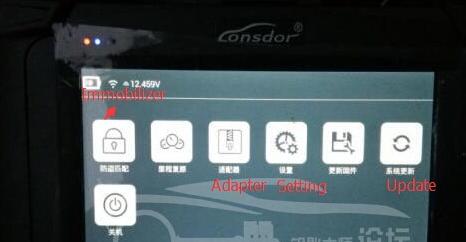
Lonsdor K518ISE/K518 key programmer comes with built-in Volkswagen 4th & 5th adapter, so it can read pin code and program key for VAG 2th, 3th, 4th, 5th Immobilizer by OBD directly.
Iprog Pro car key programmer,it can also support Airbag,carradio,dpf off, ECU,IMMO KEY, MIL TO KM, PINABS, PINCODE SMATRA3,PINCODE SENSOR SPEED LIMIT,ODO Adjust,EEPROM,MCUAtmel,Fujutsu, Microchip,Motorola, Motorola912EN,NECV850,BLR,CAN,CRC-Cript,ibutton,sd-unlocker,test.Supports vehicles till year 2019.
Iprog review 1:
Isuzu Dmax 2010 all key lost done by Iprog
Iprog review 2:
I ordered one iprog clone, I can cofirm that Iprog is working perfect on these keys: to reset a used Smartkey of Subaru Impreza (renew, make virgin), it is a DENSO 14ACA Type.
Iprog review 3:
Iprog plus masos for the drop of the car and the car box will be closed dpf egr evap car toyota and Lexus will make the car use the stand.
Iprog review 4:
My iprog can do good work.
Credits to one DK veteran.
Next is to Iprog problems and solutions:
Problem 1:
I have a 2010 GMC terrain , I purchased the car and it has 999999 on the dash board when I scanned it, GDS2 shows me it has 16.7 million miles , my question is I am trying to put the mileage back to original state of 257.000 KM car is Canadian I am going to be using iprog is the info for it in the BCM or the cluster or Both.
Answer:
BCM should be enough, but if the dash does not display new mileage you may need to do both. 24c16 in dash and BCM.
Problem 2: How to solve iprog clone pin test error?
Q: I bought a iprog clone from ebay in last week. but I tried read eeprom in dash, there was a pin test error massage .I try with 93c56,86,and 66 but this error occur.
A: Connect the eeprom adapter only and run the Adapter Test.ipr in menu to check wether the adapter is good or bad.
Q: sir I tested and this massage show and after translate to English….
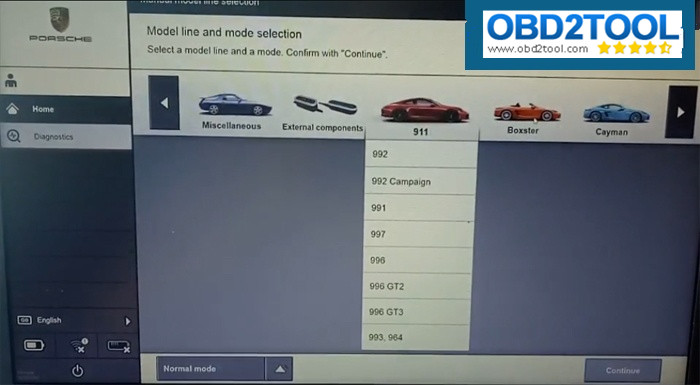
Porsche PIWIS Tester III is the new third-generation Porsche diagnostic tool,it can support the car from year 2005 to year 2019.VXDIAG Porsche Piwis 3 with the same functions of Porsche Piwis3


 rogramDataGDS2PersistentDataDownloadsDataBackups
 Open “GDS2” on the desktop. Click “Diagnostic”.