Hi everyone! We're hard at work trying to keep our community clean, so if you see any spam, please report it here and we'll review ASAP! Thanks a million!
Here is the John Deere Service Advisor Installation guide on Win7/Win10.The steps of installation on win7 is same as win7.I will show the John Deere Service Advisor installation on win7,you just need to check the method.And at end of article you would better watch the video guide.
John Deere Service Advisor Freed Download:
Note:Try on WIN7 32bit successfully, try Win10 64bit at your own luck.
Procedures of John Deere Service Advisor Installation:
Installation Method 1:
1.you must have enough disk space to download the full set of February 2016 data base (52Gb); it comes with seven iso images and the SA4.0 image and a February 2015 update which you don’t need and of course the activator.
2.use an iso mounter software to mount the SA4.0 image to a virtual drive.
3.browse to the setup file in your virtual drive and run it as administrator
follow the steps (it will prompt for a username and password use those of your windows user account if you’re under 7-8 or 10 windows version)
it will take a while! don’t turn off the computer and don’t worry about the incompatibility messages that windows will show you during the installation process specially for the SQL 2005 server installation.
4.after completing the installation of the SA4.0 reboot the computer and set back the system time to mars 2016.
5.mount the first iso image of the data discs to a virtual drive, browse the sauce folder and run setup file as administrator; wait for it to complete the installation it will launch the SA 4.2.005 at this step you may have a message that the SA 4.2.005 is not capable of launching the search engine don’t worry close it and go to task manager (ctr alt sup)
click on services and look for the LightweightIDOL service if it’s stopped than run it.
6.run the activator as administrator and activate the service advisor; don’t use the prolongation tool at this step!.
7.now go to the task manager again and look for the SAupdater service and disable it.
8.re-open the service advisor, click the accept button for the license agreement, and configure the path for the data access you can use the mapping for a virtual drive choice to map each data disc image to a virtual drive it will take more than an hour to load all the data disk.
it will ask you for scheduling the update choose the end of the week and create the task.
9.Now close the SA, use the activator again but this time just use the prolongation tool choose 9000 days or whatever you want.
10.Look for the task scheduler and run it, choose the SAupdate task and modify the time for the task to begin to 2030 or whatever you want.
11.reboot the computer and set back the time machine to the actual time, launch SA and everything must work ok.
if you have any trouble than you messed something just clean up and reinstall.
– Be sure that you have JAVA and Acrobat reader installed on your PC (wich if you have a internet connection it will automaticly ask and find and load its self) – Mount the CD JDSA4.0 and start the installation .. – a user name and password will be reqired .. so better to use User: Admin Password: 123456
– after the Installation, dont run the program !
– restart your PC , – after the installation, use the keygen
– how to use the keygen
– you need to find the Host ID for the installation .. – Run crogram FilesECULPECULPINIConfig.exe – Get HostID from Security tab – open the keygen and put the Host ID , choose the expire date, select all in both fields and generate. – you will get 3 files – run dl.xml.reg file and confirm registry changes – copy license file jdlm.lic into C:JDLM folder – PS. DO NOT USE dl.xml.reg file or dl.xml files generated by keygen,( delete the two file made by kg) – USE the files in the lic folder.
WIN XP: Cocuments and SettingsAll Users.WINDOWSApplication DataService ADVISOR WIN 7: CrogramDataService ADVISOR – Go to patch1 folder and – run Patch.bat
– Replace the Original ServiceADVISOR.exe with the Patched one from _patch floder !! in the Installation folder Crogram FilesService ADVISOR .
– Mount the DVD1 (AG_EN_20xxxx_01) and start the installation from it in otherwords what i do is copy and paste the data disk 1 in my documents folder. right click and explore the folder, run the install from the SAUCE folder and then open the sa.ini folder it will look something like this [Volume] Identity=AG_EN_201109_01 Produced=2011/07/15-22:48:58 [Trigger Dates] Warning = 2011/10/28 Termination = 2011/11/01
– ***Replace the Original sa.ini with the patch we will create, in the DVD1 !!BEFORE YOU LOAD THE DATA!!!!! IN THE PROGRAM. – To do this – In the sa.ini folder change the dates to what ever you desire to mach the lic experation you made so it will look something like this
– Exit the document and select save changes. ( I like to reopen the sa.ini after to insure changes.) -then open service advisor. it will promp you to load data. change the path to load to the location you saved data disk 1. let it load ……….and SUCCESS!!!!!
Add smart key: to add a smart key or program on all key lost; Delete smart key: delete the already programmed smart key; Read the CEM security data: dismantle & read CEM to backup security data (this is a must before programming); Read the KVM security data: dismantle & read KVM to backup security data (this is a must before programming); Key identification and unlocking: to detect whether the key is a new unused one. If the remote control is invalid after programming (on condition that the battery has been installed and the remote frequency is correct), try to import the CEM safety data to unlock the key and program again after unlocking. Note: it can only unlock the CEM safety data of the vehicle or the corresponding vehicle
Module identification: identify the body CEM / KVM module status, please do this before all the operation, this function can ensure the module status, and distinguish between full-keyless / half-keyless. In addition, when the safety data backup is completed, and the module has been installed where it should be, please perform “module identification” again just in case and then proceed programming.
Note:
When programming Volvo 6-button keys, please be sure to dismantle&read the CEM and KVM first, as to their location and how to read, please refer to the “Operation”. First time to use the adapter, you need to bind it with K518ISE key programmer. Go to the K518ISE home page and choose “Settings -> Bind adapter”, following the direction to finish binding. One K518ISE host can bind up to 5 adapters, and the bound adapter can not be bound to other K518ISE hosts. Once bound, no need to bind again. For the 6-button key, you need to dismantle & read the CEM in the co-pilot storage box,as well as the KVM in the right trunk to backup security data. Connection between K518ISE host, adapter and RN-01 board :
Read Volvo CEM please use RN-01 board:
6.Connection between K518ISE host, adapter and FS-01 board:
Launch X-431 V HD3 is a modified version of the multi-brand scanner Launch X-431 Pro which, in its new edition, received a more powerful tablet and a diagnostic function for heavy duty vehicles. The device includes all the advantages of the Pro series and is presented with advanced diagnostic algorithms that allow you to quickly and deeply test the car. The complete set HD – is intended for trucks diagnostic.
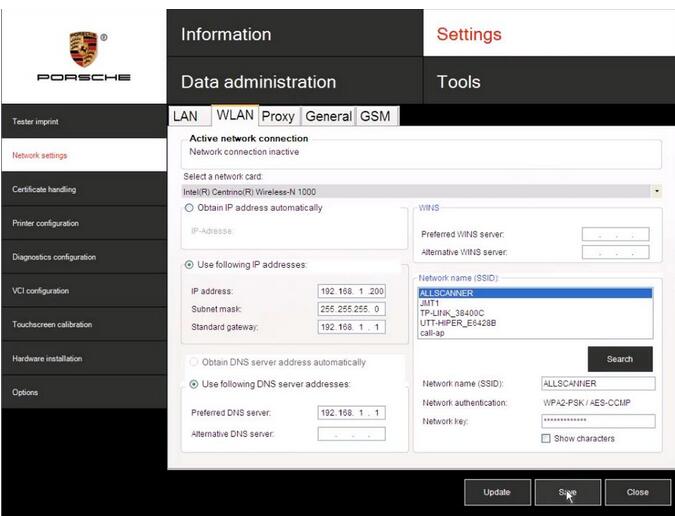
Here is a guide on how to set LAN & WLAN network for Porsche Piwis ii diagnostic software.
Part 1: Porche PIWIS II LAN Network Setting Part 2: Porche PIWIS II WLAN Network Setting
Part 1: Porche PIWIS II LAN Network Setting
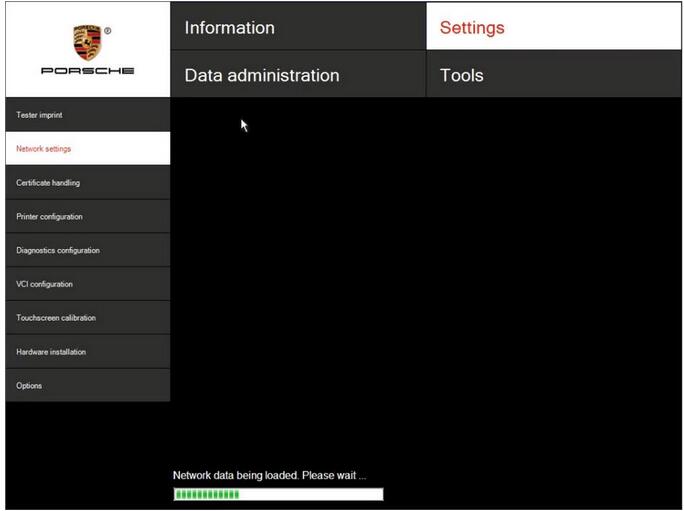
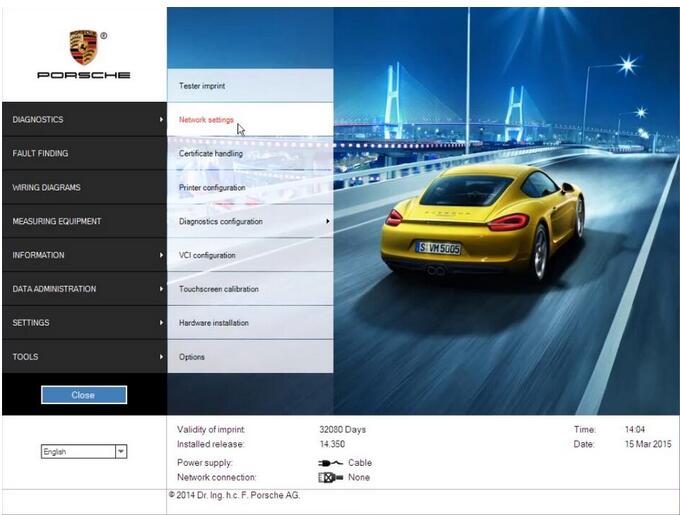
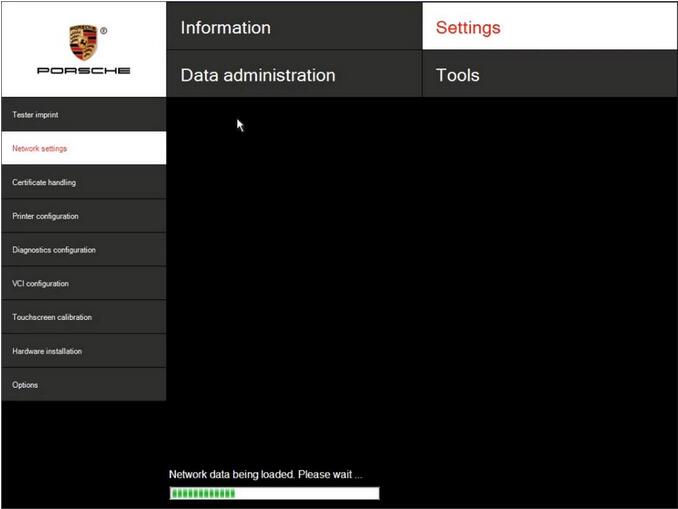
1.Click [SETTINGS]->[Network settings]
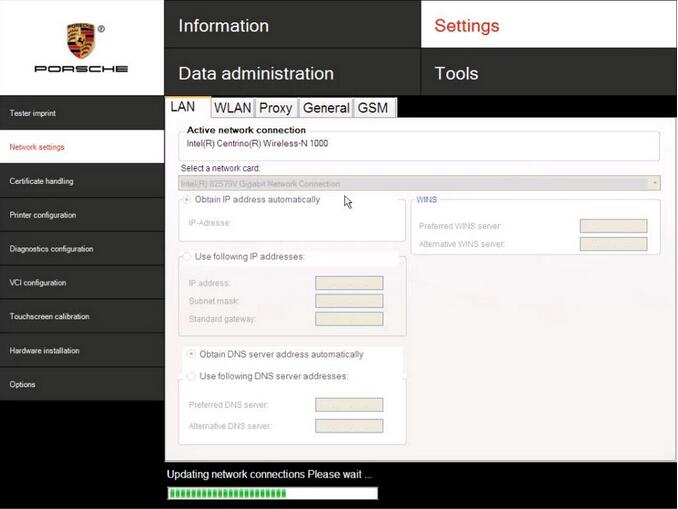
2.Click [LAN],then Select a network card
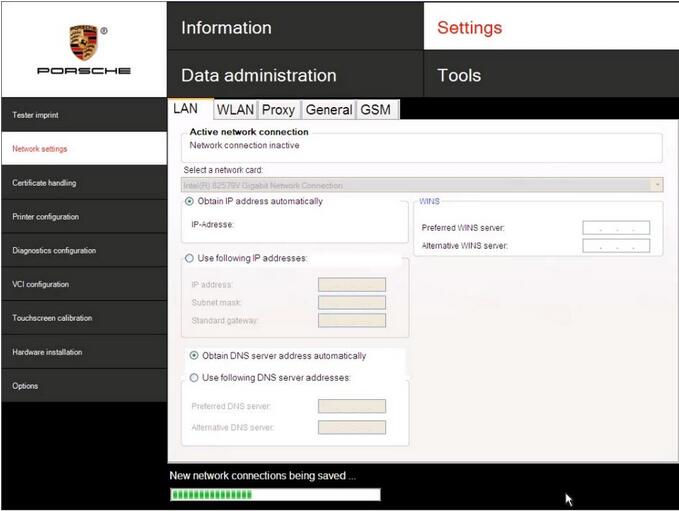
3.Obtain ip address automatically:select [Obtain IP address automatically] and [Obtain DNS server address automatically],then click [Save]
4.Manually settings IP address : select [Use following IP addresses] and [Use following DNS server addresses],then input IP address,subnet mask,standard gateway,Preferred DNS Server,then click [Save]
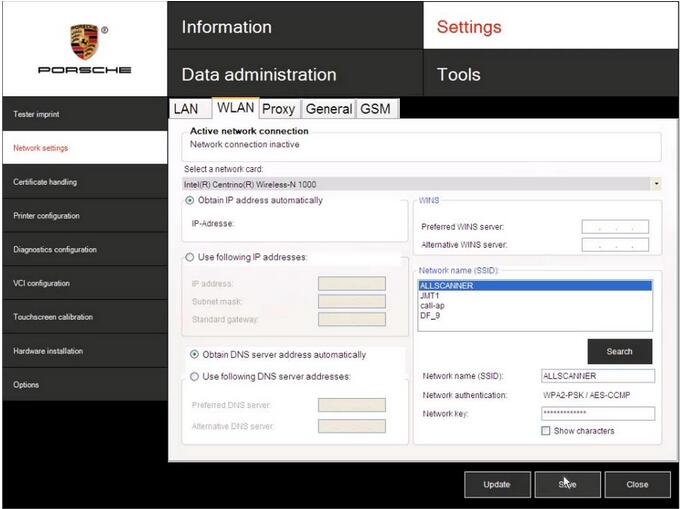
4.Obtain ip address automatically:select [Obtain IP address automatically] and [Obtain DNS server address automatically],then click [Save]
5.Manually settings IP address : select [Use following IP addresses] and [Use following DNS server addresses],then input IP address 、subnet mask 、standard gateway 、Preferred DNS Server , then click [Save]
If you to get Best Price Porsche Piwis Tester II,please Connect us: [email protected]
Cat electronic technician 2019C is an updated version of the caterpillar dealer diagnostic software.
Cat works with the caterpillar Communication Adapters family. The recommended adapter is a caterpillar Communication Adapter III Kit PN 538-5051 (Replaces 466-625. This diagnostic app allows you to: Change vehicle’s parameters Lock / Unlock parameters Diagnose and reconfigure Reading of error codes ECM Flash Caterpillar ET Getting Started Guide in PDF Format What’s New – 2019A
ECM Naming Changes
Certain ECMs connect to the service tool over two data links at the same time. The service tool shows a message popup when the ECM is only detected on one link. The service tool has been changed to add the text **INCOMPLETE** in the ECM name when the connection is incomplete. Service tool features that display a connection icon also use a new icon for an incomplete connection. What’s New – 2018C
No significant new features or feature enhancements What’s New – 2018B
CEOS Fleet Configuration File TOP
A CEOS (Customer Electronic Option Selection) Fleet Configuration File can be created/modified for an engine using the Service Tool. This is available in connected and disconnected mode.
Error When Launching Service Tool
There is a Microsoft issue with upgrading libraries during an installation involving certain versions of the C redistributable. After a successful service tool installation, when trying to run the service tool for the first time, one of the following errors may occasionally appear: “The entry point could not be located in api-ms-win-crt-runtime” or “The program can’t start because mfc140u.dll is missing from your computer.” If either of these messages is displayed, please let us know and we will send you to step by step troubleshooting guide. This procedure requires administrator rights.
HaveC6 Corvette, last year I did a major engine compartment detail getting our car ready to put in a big Corvette show at a GM dealer and club sponsor. As soon as I started the car after the detail I had the check engine light come on with a fault code indicating “high intake air temperature” WTF? Luckily I had just recently received the Tech II Scan Tool clone that I purchased and was able to retrieve and clear the code. It has been a year now and no more codes have come up since. My daughter also recently had an air bag fault code set on her Chevy Cruze that resulted from trying to crank the engine with a low battery that resulted from her kids playing with the dome light and leaving it on. The rapid clicking of the starter solenoid triggered the air bag fault and it required a Tech 2 to cancel that fault as well. From where to have one Tech2 clone? You can buy anywhere but is better if have a quality control number on interface Tech2 clone from OBDII.SHOP
This is for anyone when he/she runs the John Deere Service Advisor Heavy Duty Scan Tool software, the system appears error message that the search engine module can not be loaded and then the program ends.
NOTE THAT YOU ARE TRYING ANY TRICK ON YOUR OWN RISK.
Optional solutions:
Solution 1:
Run as system administrator, roll back pc date reactivate using activator Then roll date back to normal date if error still renew once again. Been working for me so far.
Note that, don’t know how long it stay working but works im sure someone will have solution for it soon.
Also advice if doing fresh install roll back the date on pc do the install after then install and activations have been done. Go to task manager look for the service adviser on have it start its tasks in 2030 :save and then reset your pc date should be good for while
Solution 2:
if you set a date before the lightweightidol license expired, start the lightweightidol service, set the real date and start Advisor, it works.
Solution 3:
start advisor. when error comes with “search engine” Close John Deere SA. afterwards set your PC date to feburary 2015. start SA again (run as administrator). it now comes with error on licence. close SA Again. set pc date back to normal. run SA Again. now it Works.
Solution 4:
The john deere edl v2 search engine error can be solved. Set back the date, before the expiry date found in Service ADVISORSUIRlicense.log (august 14 in my case). Start LightweightIDOL service. Set the real date, and Advisor working again. I made a batch file to simplify it. To make it work Control Panel/Regional/short date format have to be yyyy-mm-dd or you have to modify batch. Maybe you have to modify ServiceADVISOR.exe path too in the batch. Have to run as administrator.
Sa.rar
Solution 5:
I have had the same error with ssearch engine connection in JD SA. reinstalled it twice, changed system date back and forward, run activator. No result for me.
But actually I found the solution for this issue. And the error disappeared.
newer data discs (2016/02)
Solution 6:
back date to 08.10.16 install JD SA, restart, activate, mount latest disk you have (05.2016) and install update, for finish get license error, ignore and close, set actualy date, run JD SA -> works fine, install july update
testing today on 3 laptops (Windows 7 and 10)
On a side note: procedure about turning off the updates
don’t know how long it stay working but works im sure someone will have solution for it soon.
Also advice if doing fresh install roll back the date on pc do the install after then install and activations have been done. goto task manager look for the service adviser on have it start its tasks in 2030 :save and then reset your pc date should be good for while Smile (SO TURN IT OFF IN TASKMANAGER SO IT STARTS 20 30 YEARS FROM NOW!!)
Fresh new installations also work but can be much more complicated sure a patch would be much easier. But it can be done with out a patch so far
In taskmanager I don’t stop any service just put service advisor updater to 2030 to start
also makes sure eculp.ini configurator reads like this
A valid ECULP License has been found
Licenses for the following modes have been found: TestCell Programming FinalEOL Programming Service Programming ECUCPP Programming Tool
All JD Components were found and properly licensed
JDEcu : Version 1.0 : 01-apr-2021 JDConfig : Version 1.0 : 01-apr-2021 JDData : Version 1.0 : 01-apr-2021 JDIntelHex : Version 1.0 : 01-apr-2021 JDPayloadReader : Version 1.0 : 01-apr-2021 JDPayloadProcessor : Version 1.0 : 01-apr-2021 ECULoaderProgram : Version 1.0 : 01-apr-2021 ECULP_TestCell : Version 1.0 : 01-apr-2021 ECULP_FinalEOL : Version 1.0 : 01-apr-2021 ECULP_Service : Version 1.0 : 01-apr-2021 ECULP_TestCell_OEM : Version 1.0 : 01-apr-2021 ECULP_FinalEOL_OEM : Version 1.0 : 01-apr-2021 ECULP_Service_OEM : Version 1.0 : 01-apr-2021 ECULP_ECUCPP : Version 1.0 : 01-apr-2021 ECULP_Direct_EOL_Output : Version 1.0 : 01-apr-2021 ECULP_OEM_DISTRIBUTOR : Version 1.0 : 01-apr-2021 Service_ADVISOR_Ag : Version 1.0 : 01-apr-2021 Service_ADVISOR_CF : Version 1.0 : 01-apr-2021
The last – if all tips/solutions above don’t work for you,
John Deere Service Advisor 4.0 Crack – No Search Engine Error
The Autel MaxiSYS MS908 has been built to offer extreme ease of use, powerful diagnostic /programming. It is highlighted because of an ultra-powerful A9 quad-core processor that offers a 50 percent increase in speed versus competing products.
This tool features a clear 9.7” LED screen with a high-resolution capacitive touch screen. MaxiSYS has the industry’s first multitasking Android operating system and the comprehensive OE-level vehicle coverage that Autel has become known for.
Autel MS908 Review… Here you go.
Quick processor speed and boot-up time:
It doesn’t seem to make a difference what model of car I hook it up to
The MaxiSYS (MS90 is the fastest (scan) tool I’ve ever used.”
It saves us time on every job we use it on with its quick boot-up time, ability to look at live data and ability to use bi-directional controls while not being bound by a cord.
Easy to use be’coz of the manual included:
The MS908 system comes with the manual, which was loaded onto a CD. So it’s easy to use, there is little need for the manual.
It also included 12V and 120V chargers, a USB cable, non-OBD adapters, a strap/handle and a screen cleaning cloth.
According to both reviewers, the MS908 is easy to use. Even right out of the box, minimal setup was involved.
MS908 system good at update:
Once the scan tool arrived in the shop, the only i need to do is to register the device on Autel’s website in order to perform updates. If you choose to not update it, you can use it out of the box within five minutes.
Autel is really good about updating their tools. It’s a tool to check for updates like once a week, because as soon as Autel comes up with solutions, they put them on the internet for our users.It is kind of cumbersome to pick and choose the updates through the tool, without having to hook it up to a computer, as the tool is fully Wi-Fi capable. It would be nice to set a profile of vehicles that you work on, or a sort by vehicles that you need…available updates on all vehicle makes and models, including European vehicles not serviced in the U.S.
I’ve updated mine on the road. It saves me a ton of time.
Advanced & functionable:
This MS908 offers 100-percent access on the anti-theft security systems, it allows me to send reports via Wi-Fi to another computer, it comes pre-loaded with direct links to repair info (AllData, Identifix, Mitchell 1, iATN, etc.) and that it stores vehicle histories and complete customer history, which can be retrieved through VIN auto-identification.
And I have used the tool for many advanced functions, which include performing diagnostics and resets on many vehicle makes and models and even programming keys. Have used a lot of OE scan tools before. Autel lays out data the same way OE scan tools are laid out. I am familiar with this setup logic, that if technicians are not familiar with a factory menu layout, this may be difficult for some users.
Perfect in auto key programming/module coding:
I used Autel MS908 to program keys on several vehicle makes including Ford, Dodge, Nissan and VW. And also used it to diagnose a faulty PCM in a 2010 Dodge Ram and faulty headlight modules on 11 5 Series BMWs. After replacing the new module, it had to be coded and he also had to run reference for the adaptive headlights. The Autel Scanner performed flawlessly.
In conclusion:
i would like to see functionality added for the pinion factor for Chrysler vehicles, to set speedometers. Other than that, it’s been fantastic. I rate it 9 out of 10.
How to install pcmflash1.99 for running with KTAG bench? How to use PCMflash 1.99 to read write ECU data?
Using tips:
1). The computer can’t be connected to te internet;
2). KTM Bench can’t be updated;
otherwise the machine may be locked and will be charged for repair.
The advantage of dismantling ECU and not dismantling ECU:
1). Easy to operate and save time up to 5-10 minutes. Otherwise it may take more than 20minutes to dismantle the ECU and even more than 1 hour, also the box may be damaged during dismantling.
2) Dismantling the ECU may damage the original ECU sealing condition.
3) After dismantling the ECU, the boot must be connected.
4) After reading out the data, it needs to reseal ecu.
How to use KTM Bench to read SID208 ECU?
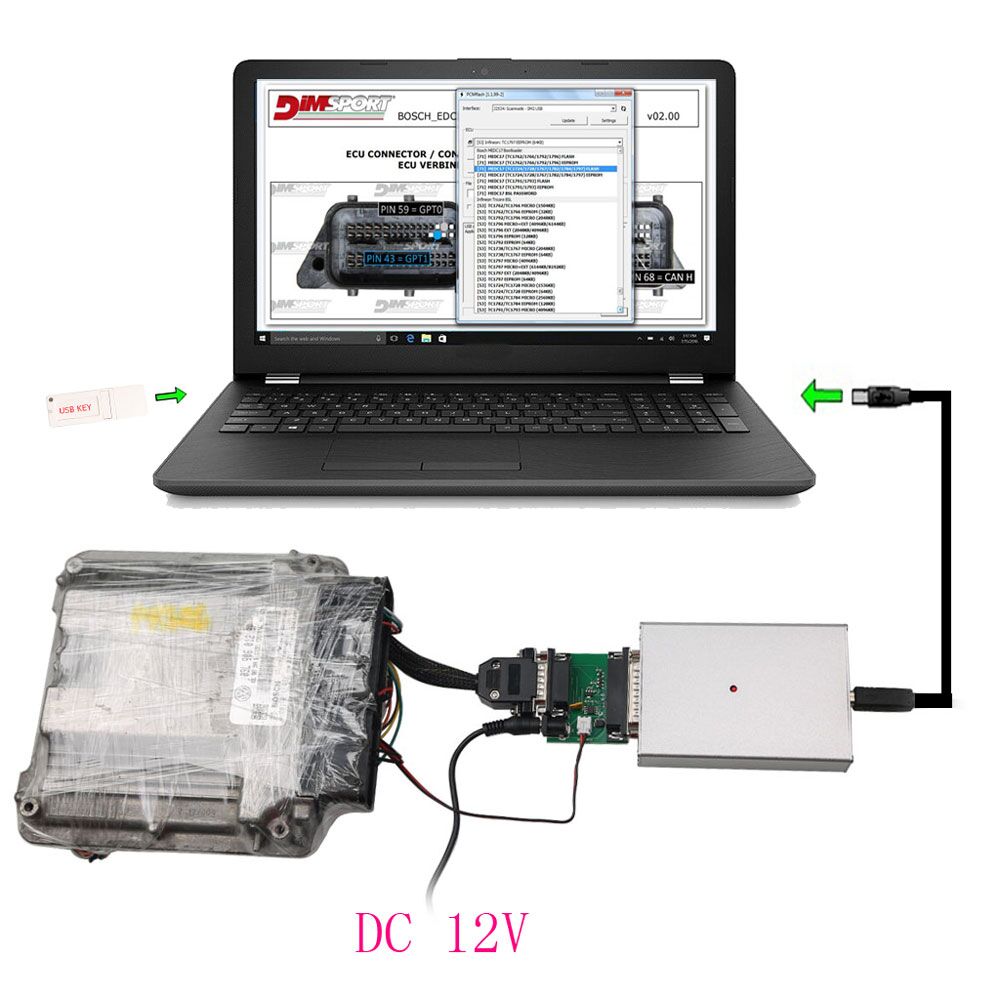
pcmflash 1.99 read the ECU data according to the ECU type as well as the CPU chip type. The wiring diagram is also based on the ECU type and CPU chip type.
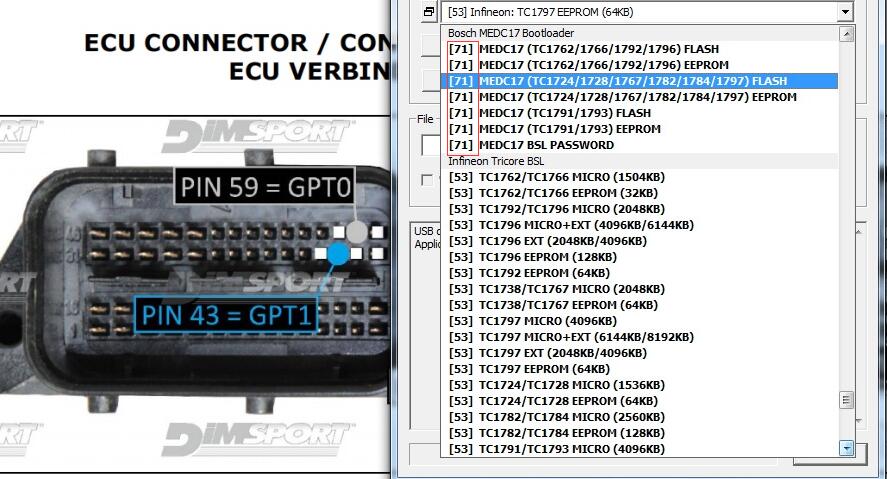
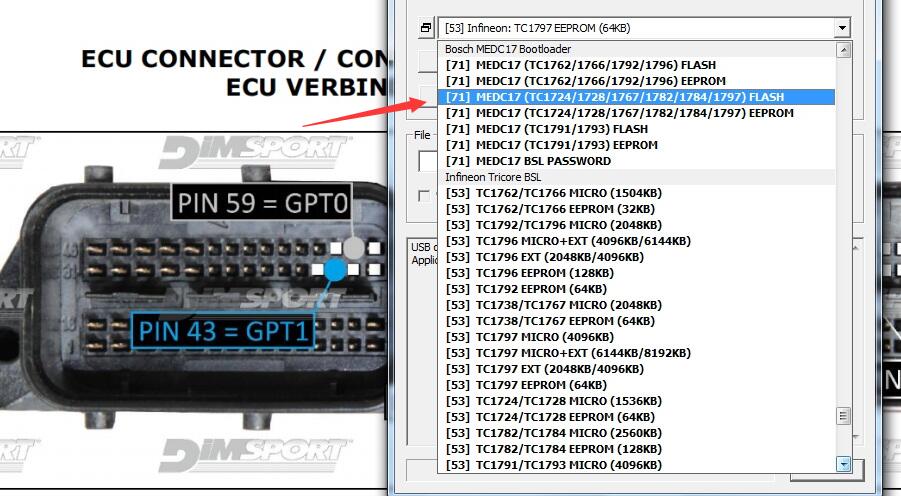
pcmflash 1.99 can read the data for all the [71] ECU types via boot cable instead of removing the ECU, but it requires to connect GPT0 and GPT1 cable.
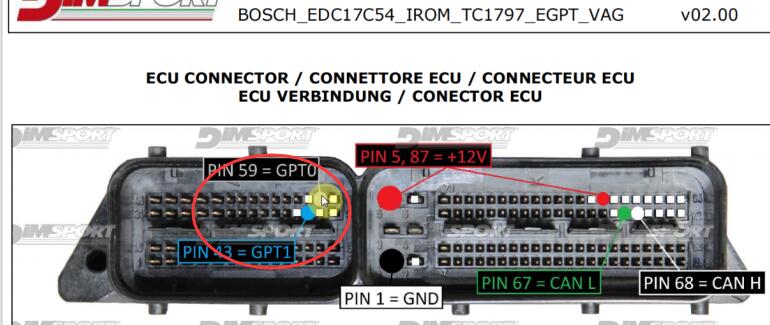
For example, if the ECU box removed from the car is edc17 c54, then the CPU is tc1797, just follow our supplied wiring diagram to connect the ECU instead of removing the ECU, good to know: GPT0 and GPT1 cables must be connected, then choose 1797 cpu option.
KTM Bench pcmflash 1.99 reads the ECU data by dismantling the ecu and connect the boot, which is as the same as KTMflash 1.95. It requires to read the password first, then choose “read the data”.


 rogram FilesECULPECULPINIConfig.exe
 ocuments and SettingsAll Users.WINDOWSApplication DataService ADVISOR


 .
.